Home/Resources/Deficiency Library

New construction deficiency library What actually turns up on a new build.

A browsable catalog of the conditions we find most often on Central Florida slab-on-grade homes, organized by build stage, written so a buyer can tell the difference between what is normal and what is worth raising.

Read this first.

Almost everything on this page is routine. These are the conditions that come up in the ordinary course of building a house quickly with a lot of different crews, and the great majority of them get corrected the same week they are identified, without any drama at all. A finding is not an accusation. It is an item on a list.

The reason to publish the list is that new-construction buyers have no reference point. If you have never watched a house go up, a torn sheet of plastic on the ground looks like nothing and a hairline crack in a slab looks like a catastrophe, when in fact the first one matters for the next thirty years and the second one is how concrete behaves. Knowing which is which changes the conversation you have with your construction manager from anxious to specific.

So the tone here is deliberately neutral and technical. We are describing what a condition is, why it matters, and when it is easiest to address. We are not describing builders, and nothing here should be read as a claim about any particular one.

One more note on scope. Whether a given item is a defect depends on the approved plans, the engineering for that model, and the manufacturer instructions for the products used. We inspect against those and against the Standards of Practice, not against a generic checklist, and there are good reasons a house may legitimately differ from what is described below.

Because even a new home deserves a second set of eyes.
Stage 1 · Before the pour.

About the pre-slab inspection

Vapor barrier torn, short, or not lapped at seams

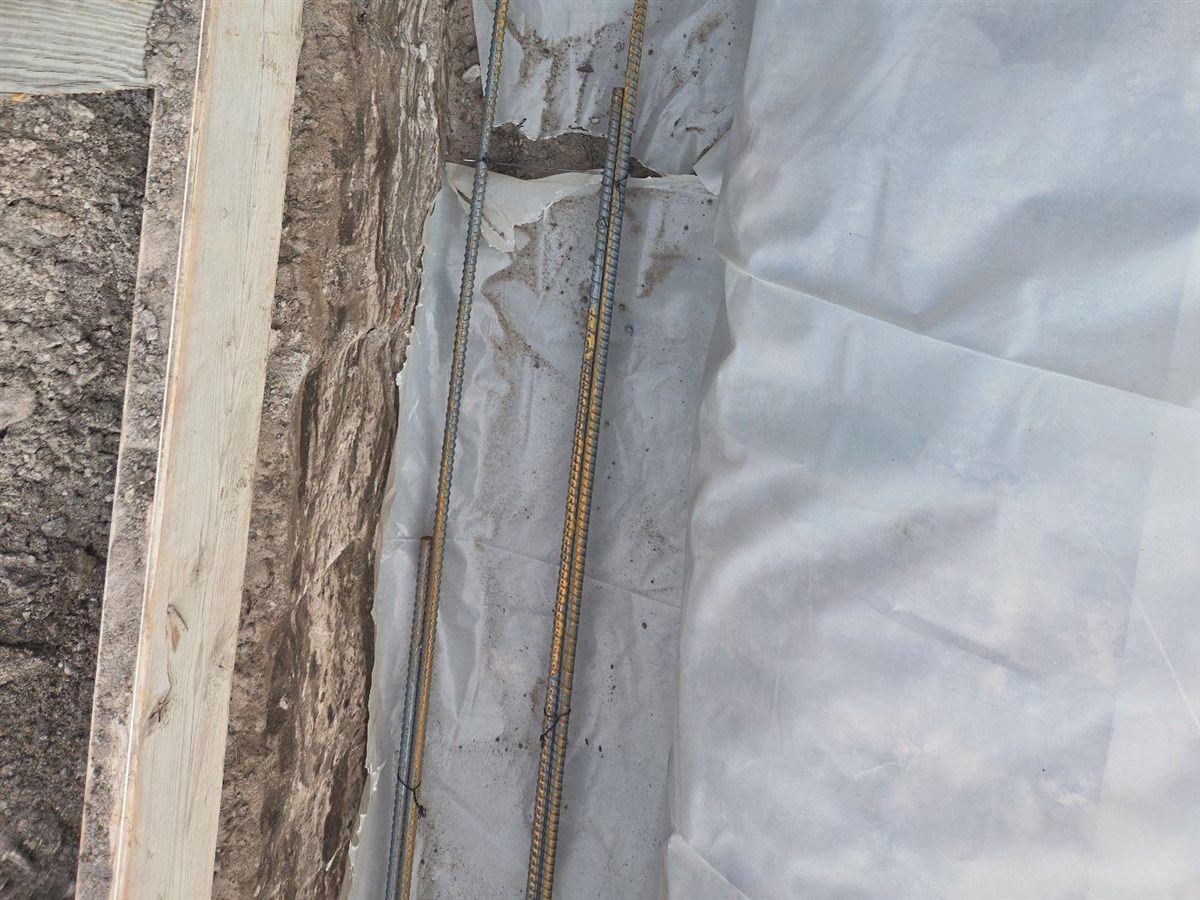
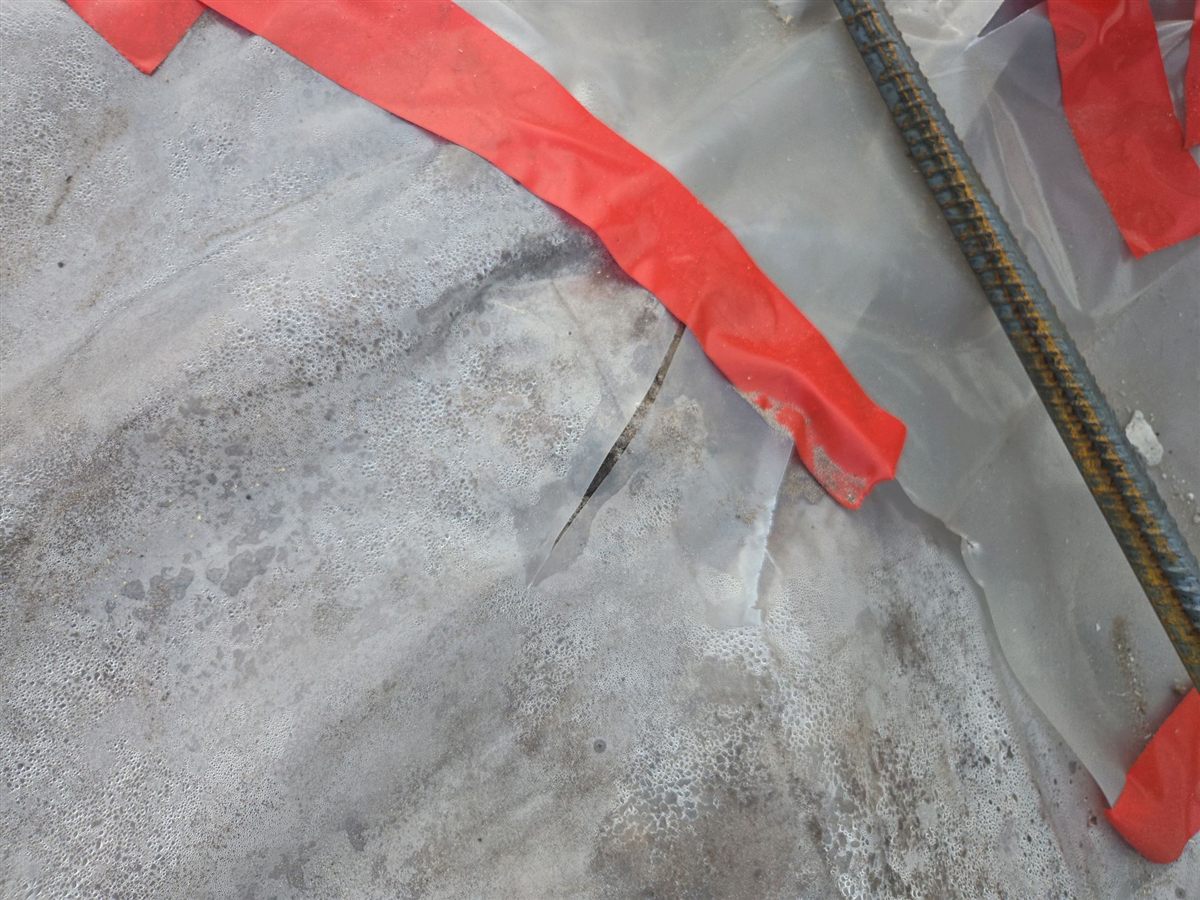
The sheet of polyethylene under the slab is what keeps ground moisture from rising through the concrete into your flooring and your indoor air. It is also walked on by every trade that works the pad, dragged over by hoses, and punctured by stakes. Tears at the edges, seams laid without the required overlap, and unsealed penetrations around plumbing are the most common findings at this stage. Every one of them is a minute to repair before the pour and unreachable forever afterward.

A tear in the vapor barrier beside a rebar dowel, marked with tape for repair before the pour
A tear in the vapor barrier beside a rebar dowel, marked with tape for repair before the pour.
Pre-slab

Reinforcement resting on grade instead of supported on chairs

Steel only does its job when it sits at the correct depth within the concrete, which is why it is set on plastic or concrete chairs. Reinforcement that has been stepped on, or was never lifted in the first place, ends up at the bottom of the slab where it adds far less strength and sits close enough to the soil to be exposed to moisture. It is visible from a distance and takes minutes to lift. After the pour there is no way to know it happened.

Footing reinforcement lying on the soil in the trench, with nothing holding it at depth
Footing reinforcement lying on the soil in the trench, with nothing holding it at depth.
Pre-slab

Short or unsecured lap splices in reinforcement

Where two bars or two sheets of mesh meet, they need a specified overlap and a tie so the reinforcement acts as one continuous element. Laps that are a few inches short, or that are simply laid next to each other without a tie, break that continuity at exactly the point where the slab is being asked to span. This is a quiet finding that almost never gets caught by anyone else.

Pre-slab

Under-slab plumbing out of position or unprotected

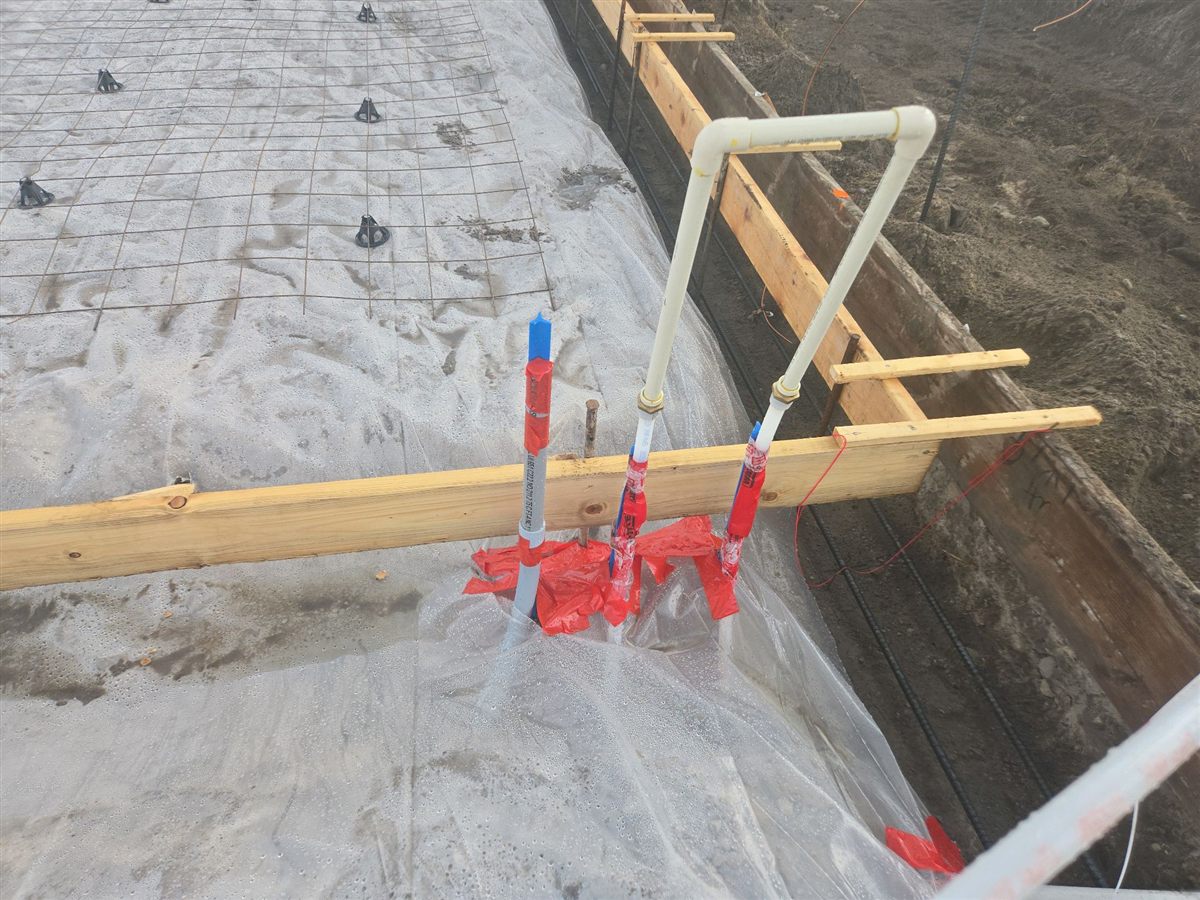
Drain and supply stub-ups are set against the plan before the slab goes down, and once the concrete is placed their location is permanent. A stub-up that is a few inches off can put a toilet flange in the wrong place or a shower drain outside its pan. We check positions against the approved plans and document whether each penetration is sleeved and protected where it comes through the vapor barrier.

Under-slab stub-ups at the form edge, marked and checked against the plan before the pour
Under-slab stub-ups at the form edge, marked and checked against the plan before the pour.
Pre-slab

Debris, standing water or uncompacted fill inside the forms

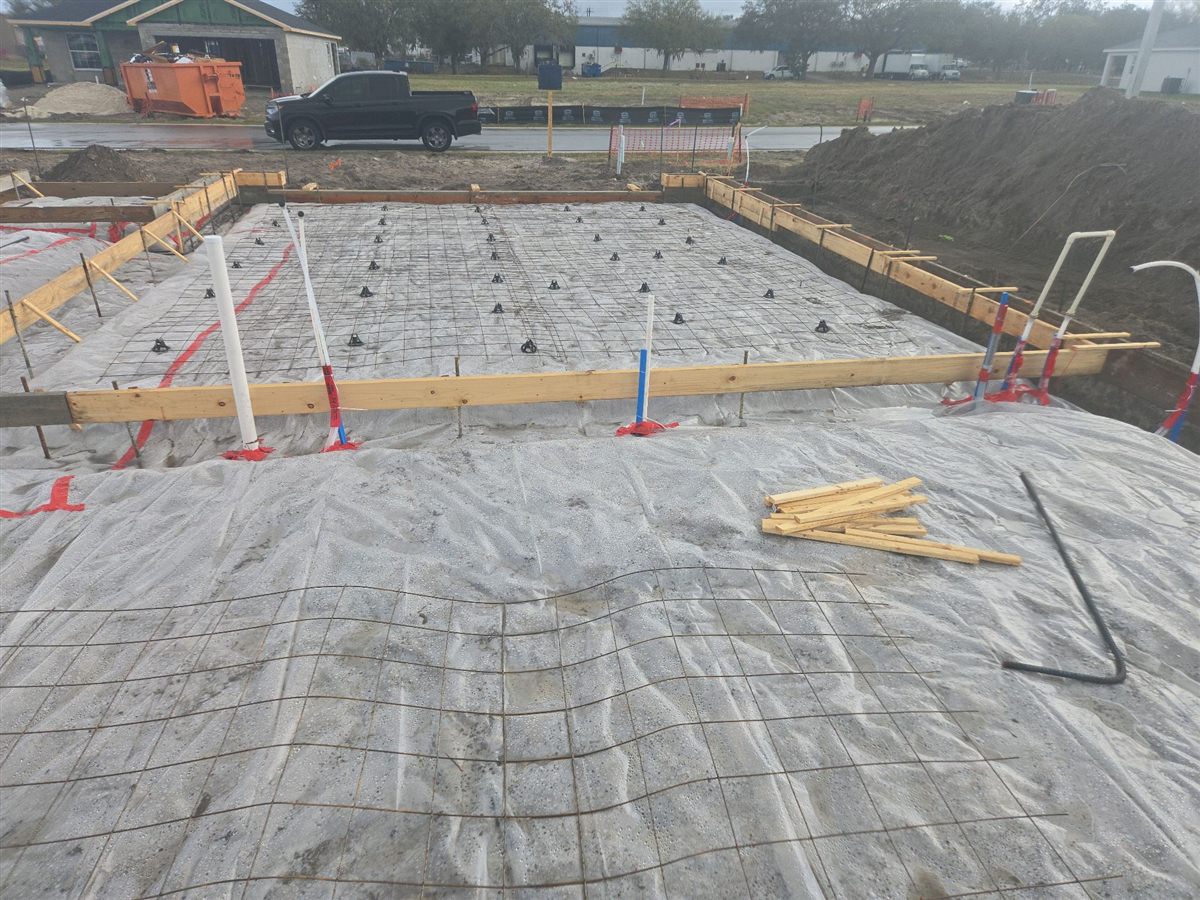
Lumber offcuts, banding, cups and mud left inside the forms become voids and weak points in the finished slab. Standing water changes the water content of the concrete at the surface. Fill that has not been compacted to the specification, or that has been rained on and rutted since it was, settles later and takes the slab edge with it. This is the least glamorous item on the list and one of the most consequential.

Lumber offcuts left on the vapor barrier inside the forms
Lumber offcuts left on the vapor barrier inside the forms.
Pre-slab

Footing dimensions and termite treatment not verifiable

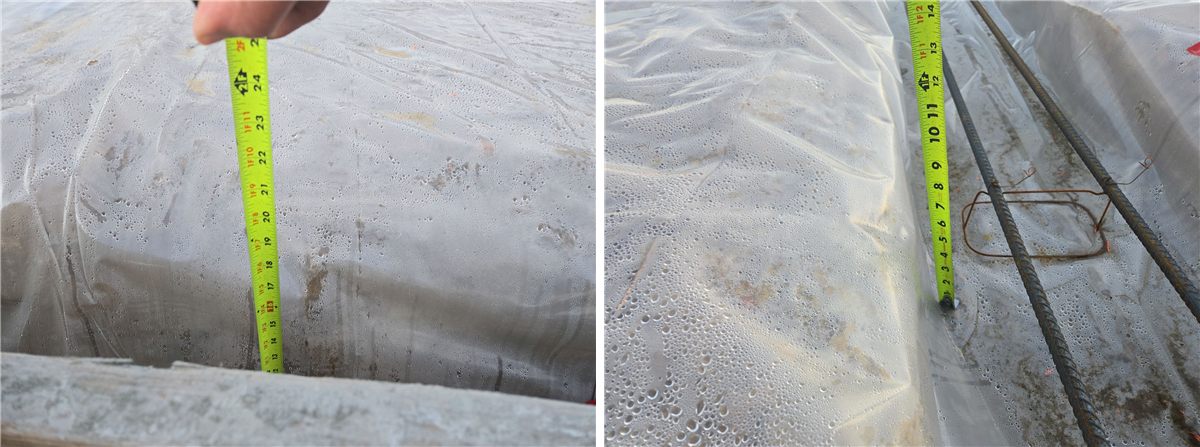
Footing depth, width and reinforcement are compared against the plan sheet, since a trench that has caved or been cut back changes the bearing the house is sitting on. At the same visit we look for evidence that the soil treatment has been applied and documented, and that it has not been disturbed by trenching afterward. Both are paper-thin items that are impossible to verify once concrete covers them.

Two photographs side by side of a tape measure in a footing trench, one showing the depth from the form and one showing the width across the reinforcement
Footing depth and width measured with a tape before the pour, with the vapor barrier already laid into the trench and the reinforcement in place. The readings are compared against the plan sheet.
Pre-slab

Stage 2 · Before the walls close.

About the pre-drywall inspection

Missing or misplaced hurricane straps and connectors

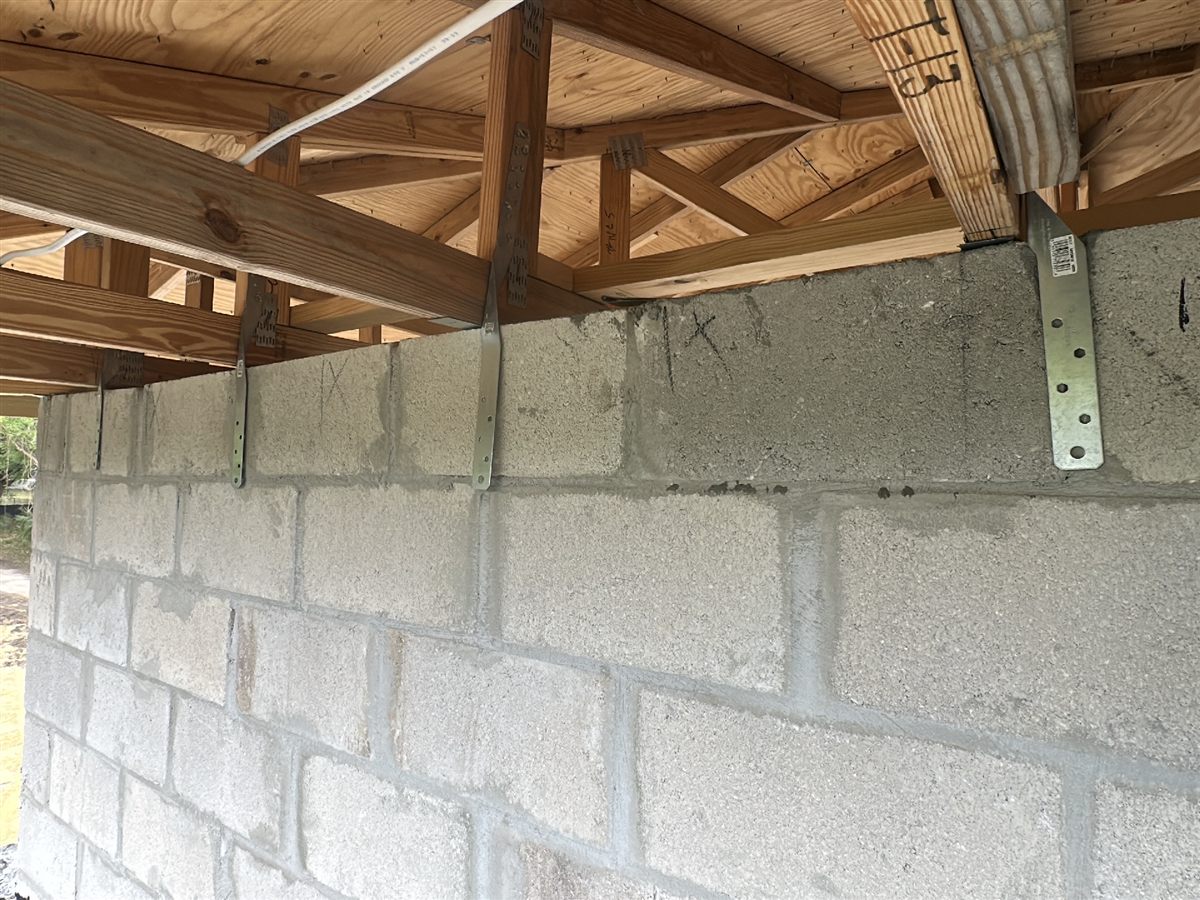
The metal connectors tying trusses to the tie beam below, with the block wall's filled cells and vertical rebar carrying the load on down to the slab, are the load path that keeps a roof attached in a wind event. In Central Florida that path is engineered, and every connector has a specified model, position and nailing pattern. The common findings are a strap missed entirely in a bay or two, a strap installed with half its nail holes filled, and a connector that is the right part in the wrong place. It is a few minutes of work before insulation and a very different job afterward.

A hurricane strap at the top of a block wall with no fasteners installed into the truss
A hurricane strap at the top of a block wall with no fasteners installed into the truss. None of the straps on this wall had been fastened to the trusses. Documented for correction at the pre-drywall inspection.
Pre-drywall

Incomplete flashing at window and door openings

Proper flashing at a window or door opening is intended to direct water away from the opening and help prevent moisture intrusion behind the exterior cladding and into the wall assembly. Most new homes in Florida are concrete block, so that flashing is a self-adhered flashing tape or a liquid-applied membrane run around the opening and onto the block, rather than a lapped sheet product. The finding at this stage is flashing that is incomplete or improperly installed: coverage that stops short of a corner, tape that has not bonded to the block or has lifted at an edge, or membrane that does not fully bridge the joint at the opening. Each is straightforward to correct before lath and stucco go on, and a path for moisture into the wall assembly once they are in place.

Pre-drywall

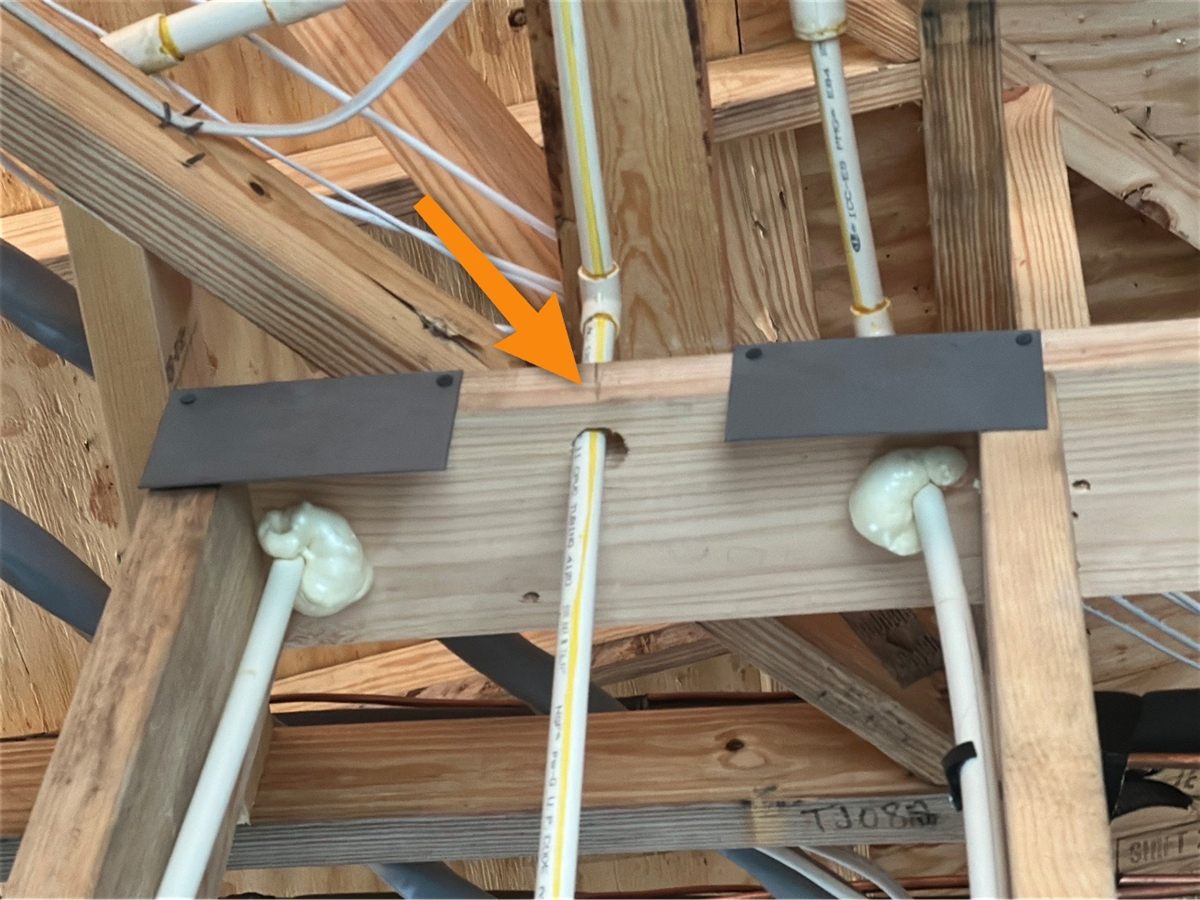
Missing nail plates at plumbing and wiring penetrations

Wherever a pipe or a cable passes through a stud or plate close to the face of the framing, a steel protection plate keeps a drywall screw or a trim nail from hitting it. Missing plates are easy to spot while the framing is open and effectively invisible after. A punctured supply line behind a finished kitchen wall is a repair that involves cabinets, drywall and flooring.

Nail plates over two penetrations, and an arrow at a third pipe through the plate with no protection
Nail plates over two penetrations, and an arrow at a third pipe through the plate with no protection.
Pre-drywall

Roof deck nailing short, overdriven, or missing the framing

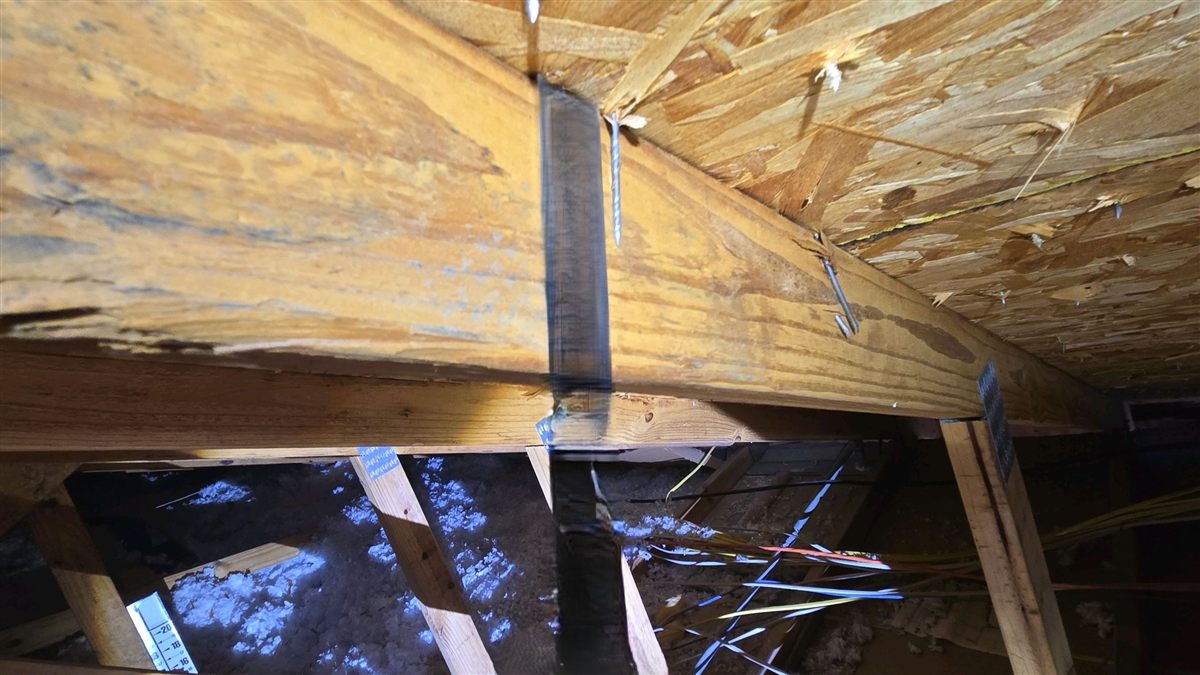
Roof sheathing is fastened on a specified pattern, tighter at the edges and corners where uplift is highest. Nails driven at an angle that miss the truss below, nails overdriven through the sheathing so the head has no grip, and rows spaced wider than the pattern all reduce how much uplift the deck can take. We check this from inside the attic space before insulation goes down, where the shiners are plainly visible.

Roof deck nails that missed the truss, showing through the sheathing beside the top chord
Roof deck nails that missed the truss, showing through the sheathing beside the top chord.
Pre-drywall

Notched, drilled or cut structural members

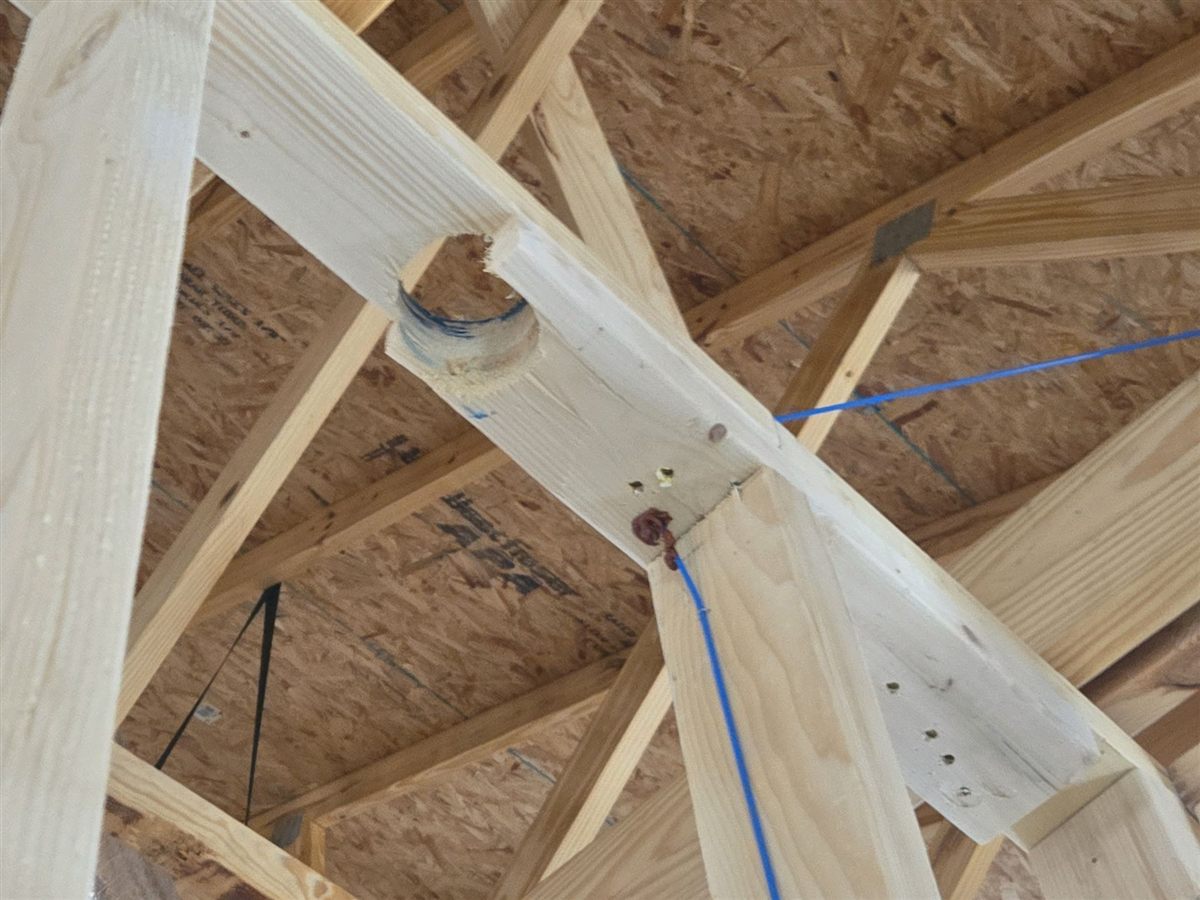
Plumbing, electrical and HVAC crews all need to get through the framing, and there are limits on how much of a stud, joist or top plate can be removed and where. Cut truss webs are the serious version of this: a truss is an engineered assembly and cutting one member changes the whole thing. Findings here are usually the result of a duct or a drain line needing a path that nobody planned, and correcting them is a repair detail from the engineer rather than a guess on site.

A large opening drilled through a roof truss member near the edge and adjacent to a truss joint
A large opening drilled through a roof truss member near the edge and adjacent to a truss joint.
Pre-drywall

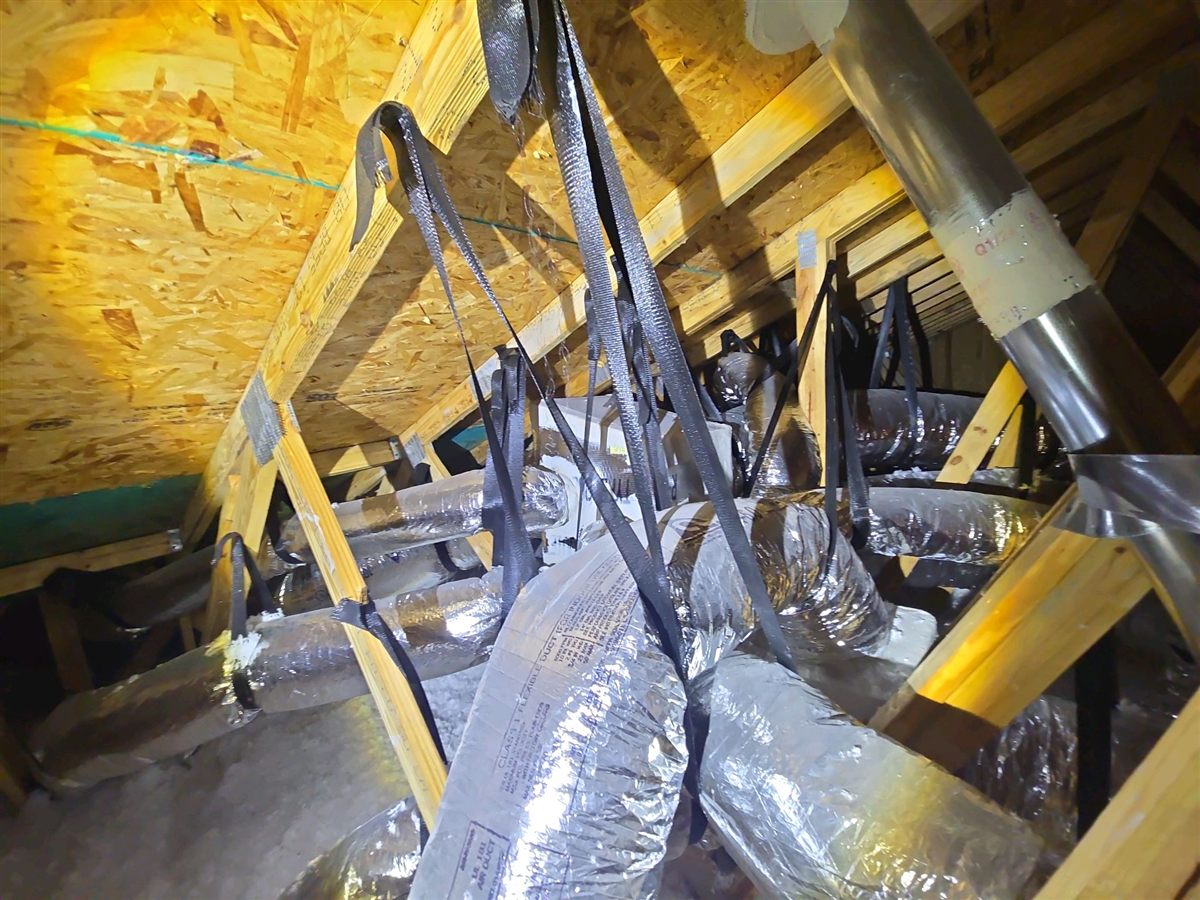
HVAC ducts crushed, disconnected or unsupported in the attic

Flexible duct in an attic gets knocked loose by whoever works up there next, and a disconnected run means a room that never gets air no matter what the thermostat says. Ducts that are kinked around a truss, compressed under insulation, or sagging between widely spaced supports lose airflow in the same way. This is best caught before insulation covers the attic floor and makes the whole space difficult to move through.

Flex ducts crushed against the trusses and each other in the attic
Flex ducts crushed against the trusses and each other in the attic.
Pre-drywall

Stage 3 · Before you close.

About the pre-closing inspection

HVAC performance measured at the air handler

A system can be the right size for the house and still deliver badly. Long duct runs, crushed or disconnected flex, dampers left closed after balancing, and undersized returns all show up in the same place: the difference between the temperature of the return air entering the air handler and the supply air leaving it. We measure both at the inside unit with the system running, rather than assuming that cold air at one vent means the system is right. A split outside the normal range is documented for the HVAC contractor to evaluate.

Two thermometer readings side by side at the air handler: 77.9 degrees on the return air side and 60.6 degrees on the supply side
Return air entering the air handler at 77.9 degrees and supply air leaving it at 60.6 degrees, both measured at the inside unit during the pre-closing inspection.
Pre-closing

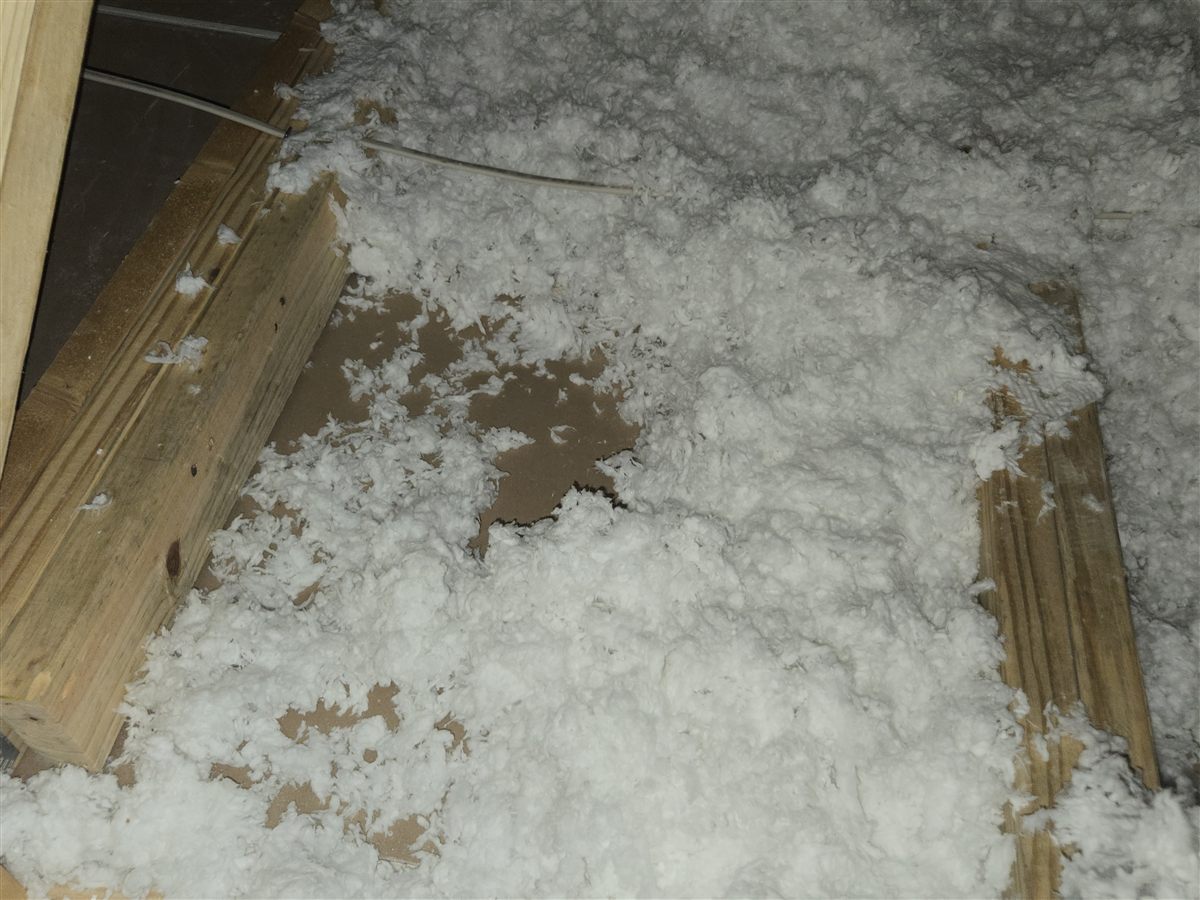
Attic insulation thin or missing at the eaves

Blown insulation is measured as an average, and the place it routinely comes up short is the perimeter, where the roof meets the wall and the space gets tight. That is also the area most exposed to hot air moving through the soffit vents. Thin coverage at the eaves shows up as rooms along the exterior walls that never keep up in August, and as higher bills for the life of the house. It is straightforward to top up while the attic is still empty of stored belongings.

Blown insulation thin enough that the ceiling drywall shows through between the trusses
Blown insulation thin enough that the ceiling drywall shows through between the trusses.
Pre-closing

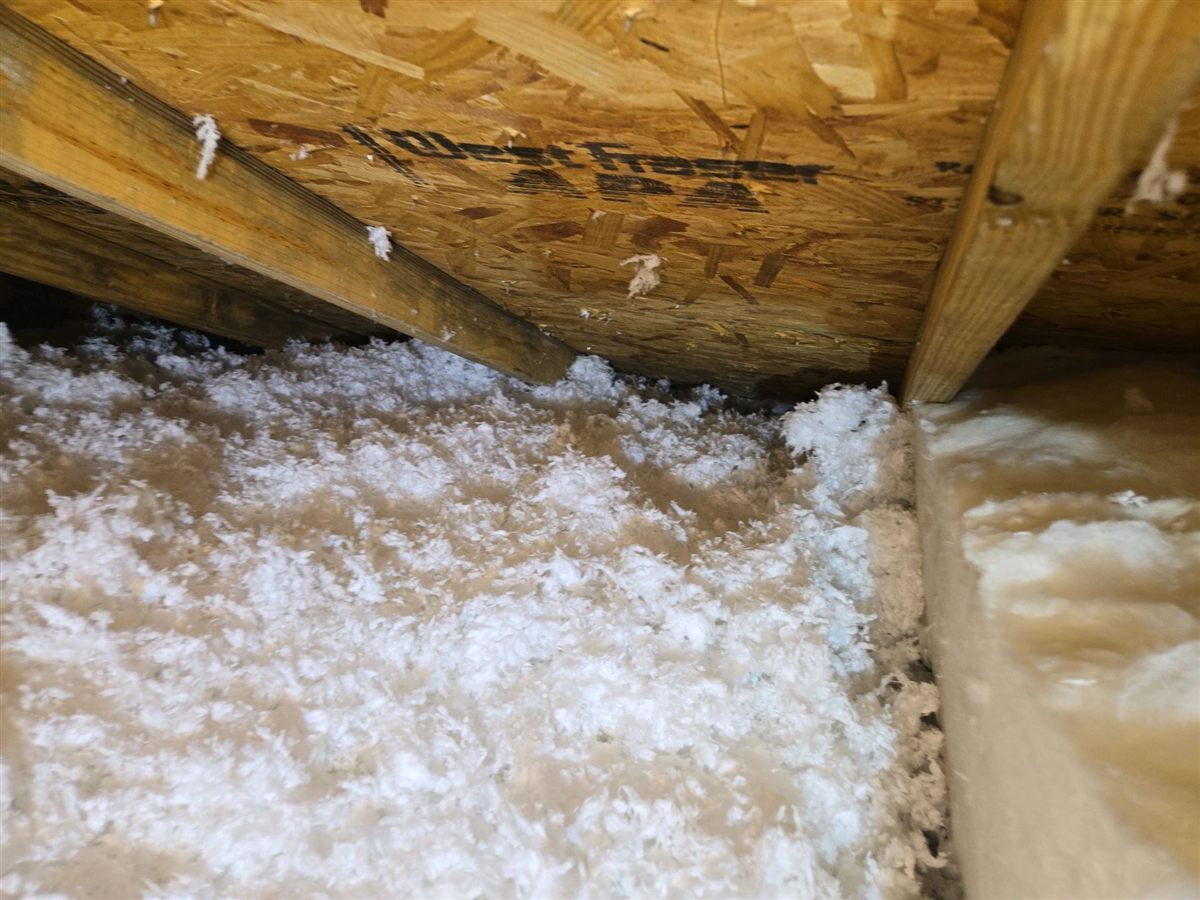
Blocked soffit ventilation

Attic ventilation depends on air entering at the soffit and leaving at the ridge. Baffles crushed during insulation, insulation blown directly over the soffit opening, or vents that were never cut open behind the finished soffit all stop that flow. A Florida attic that cannot breathe runs hotter, holds humidity, shortens shingle life and creates the conditions for moisture problems at the roof deck.

Blown-in attic insulation piled against the underside of the roof deck at the eave, with no ventilation baffle
Blown insulation packed up against the roof deck at the eave with no baffle in place, closing off the air path from the soffit.
Pre-closing

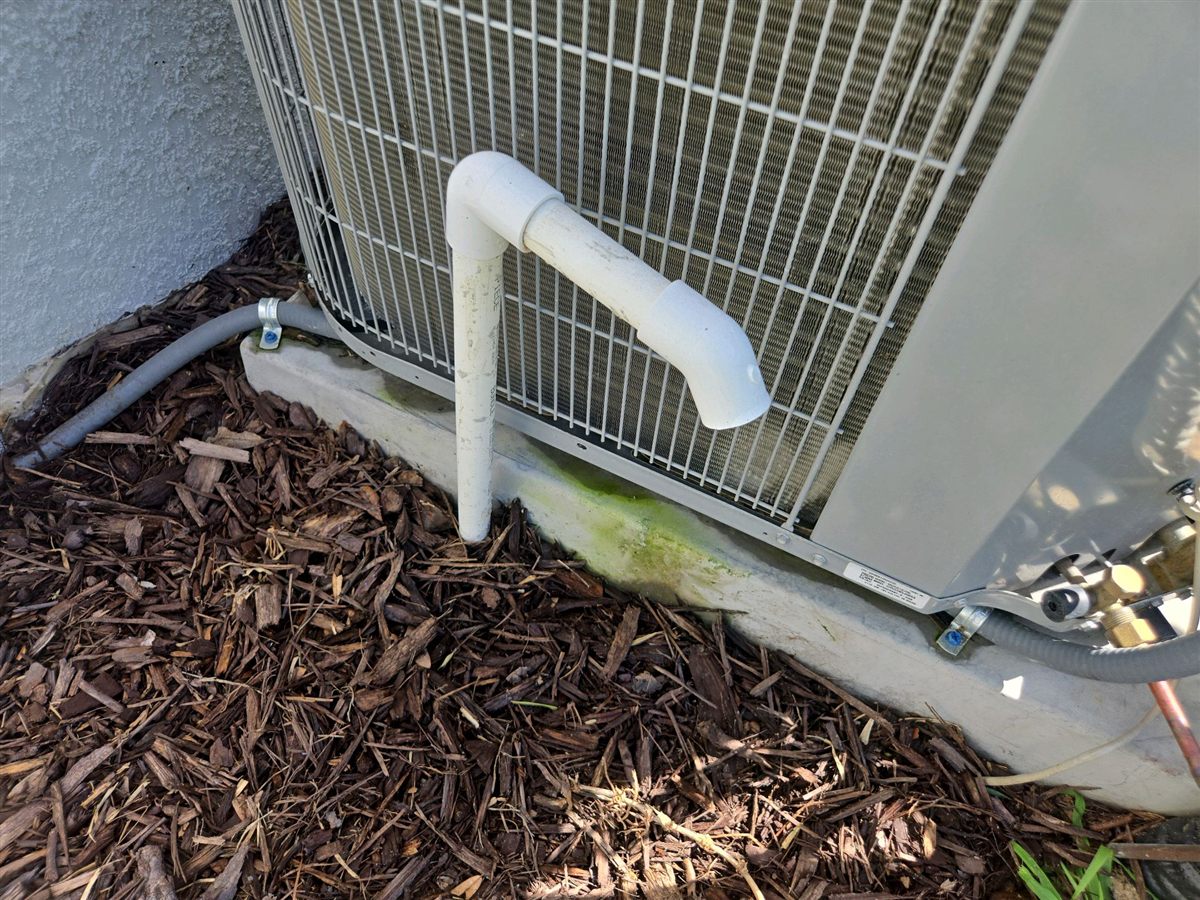
Condensate line routing and termination

An air handler in a Florida summer produces a steady stream of water, and it all leaves through the condensate line. Lines run uphill or without the trap the manufacturer requires drain poorly. Lines that terminate against the foundation, into the soffit above an entry, or into a secondary pan with no float switch to shut the system down turn a small blockage into a ceiling stain. This is a five-minute check that prevents one of the most common first-year claims.

A condensate drain line ending on the outdoor unit pad with the discharge pointed at the unit and green algae staining on the pad
A condensate line terminating onto the outdoor unit pad, with the discharge pointed at the unit and algae staining where the water sits.
Pre-closing

Negative grading against the foundation

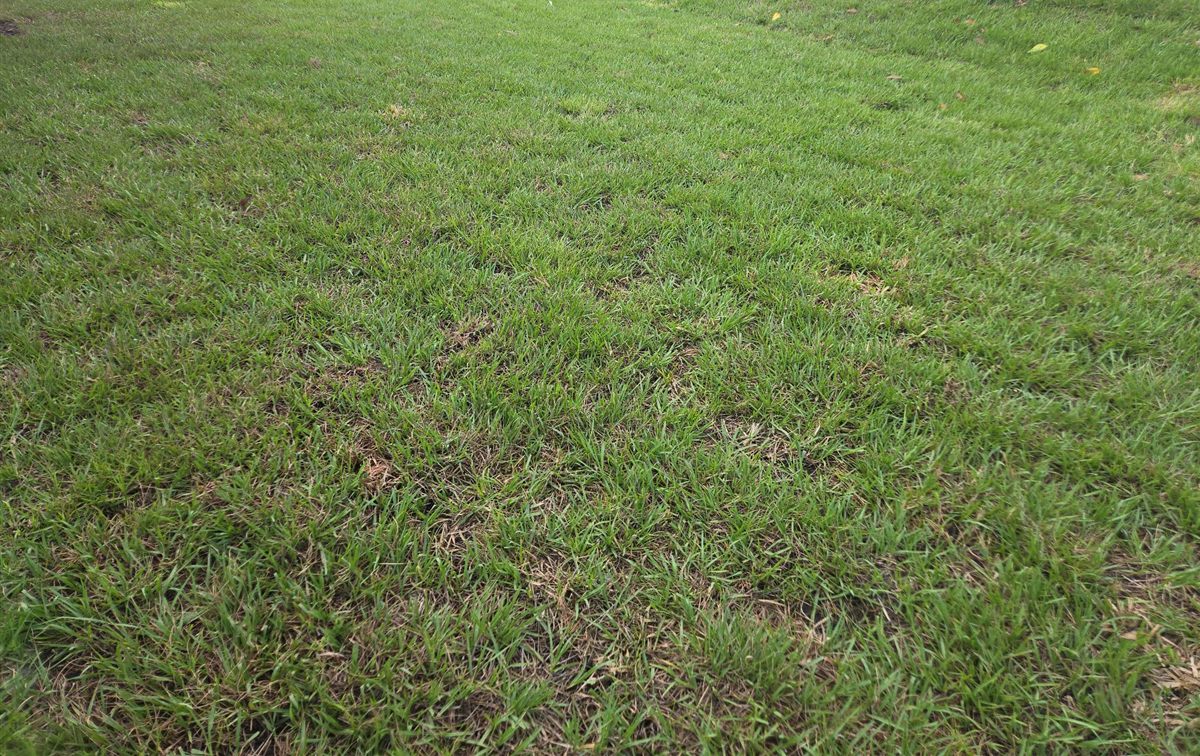
The finished grade around the house is supposed to fall away from the slab so that rain moves off rather than sitting against it. What often arrives instead is a lot that has been graded flat, or graded back toward the house at one corner, sometimes because a utility trench was backfilled late and settled. Given a Florida rainy season, water standing against the foundation is the beginning of several other problems, and it is far cheaper to correct while the landscaping crew is still on the lot.

A flagged low area in a new lawn where the ground dips instead of sloping away
A low area in the lawn, marked with flags, where water collects instead of draining away.
Pre-closing

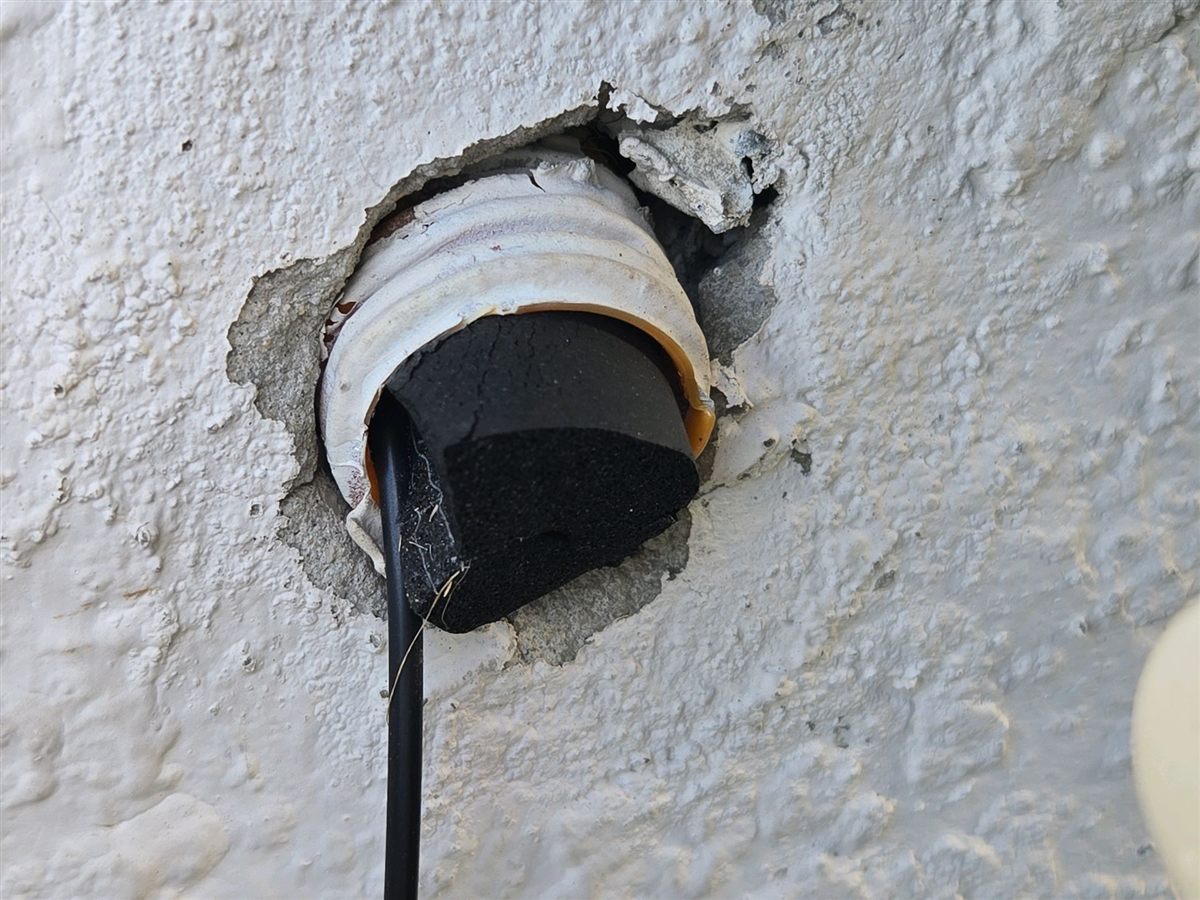
Uncaulked exterior penetrations

Every hose bib, dryer vent, electrical penetration, light fixture and low-voltage entry is a hole through the wall assembly, and each one should be sealed. They are usually the last items installed, by the crews working after the stucco is finished, which is exactly why they get missed. Unsealed penetrations let water and insects into the wall and let conditioned air out of it.

A pipe through the stucco with the opening around it left unsealed
A pipe through the stucco with the opening around it left unsealed.
Pre-closing

Stage 4 · Before the warranty ends.

About the 11-month inspection

Stucco cracking patterns

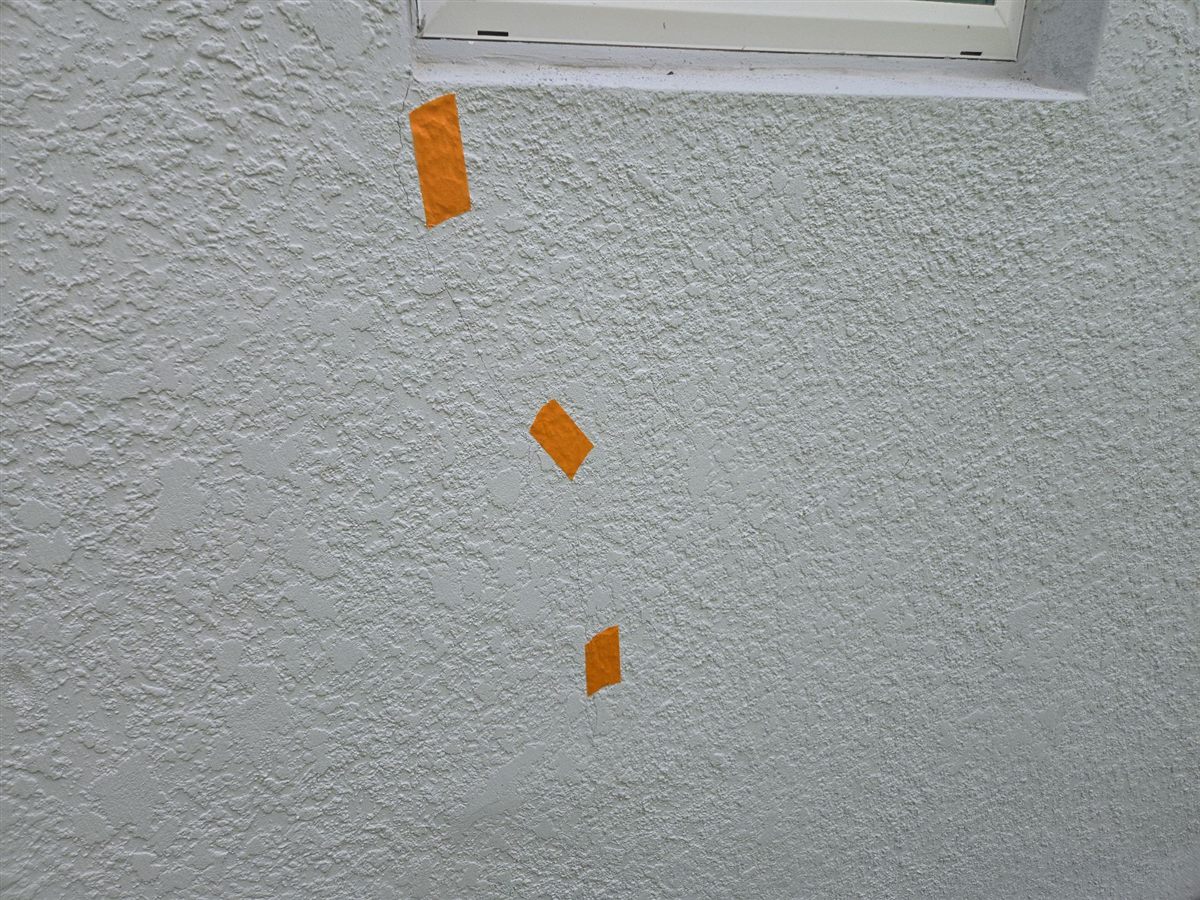
Some cracking in stucco is normal. Fine hairline map cracking across a field is a surface phenomenon and rarely means anything. What gets documented is the pattern that suggests movement underneath: diagonal cracks running from the corners of windows and doors, cracks that step along a block joint line, cracks wide enough to admit water, and any crack with displacement across it. At month 11 the house has been through a full year of heat, humidity and rain, so the cracking you see now is the cracking that is going to be there. Documenting it with locations and widths gives you a baseline and gives your builder something specific to evaluate.

A stucco crack running down from a window corner, marked with tape at the 11-month inspection
A stucco crack running down from a window corner, marked with tape at the 11-month inspection.
11-month warranty

Settlement at driveways, walkways and patio slabs

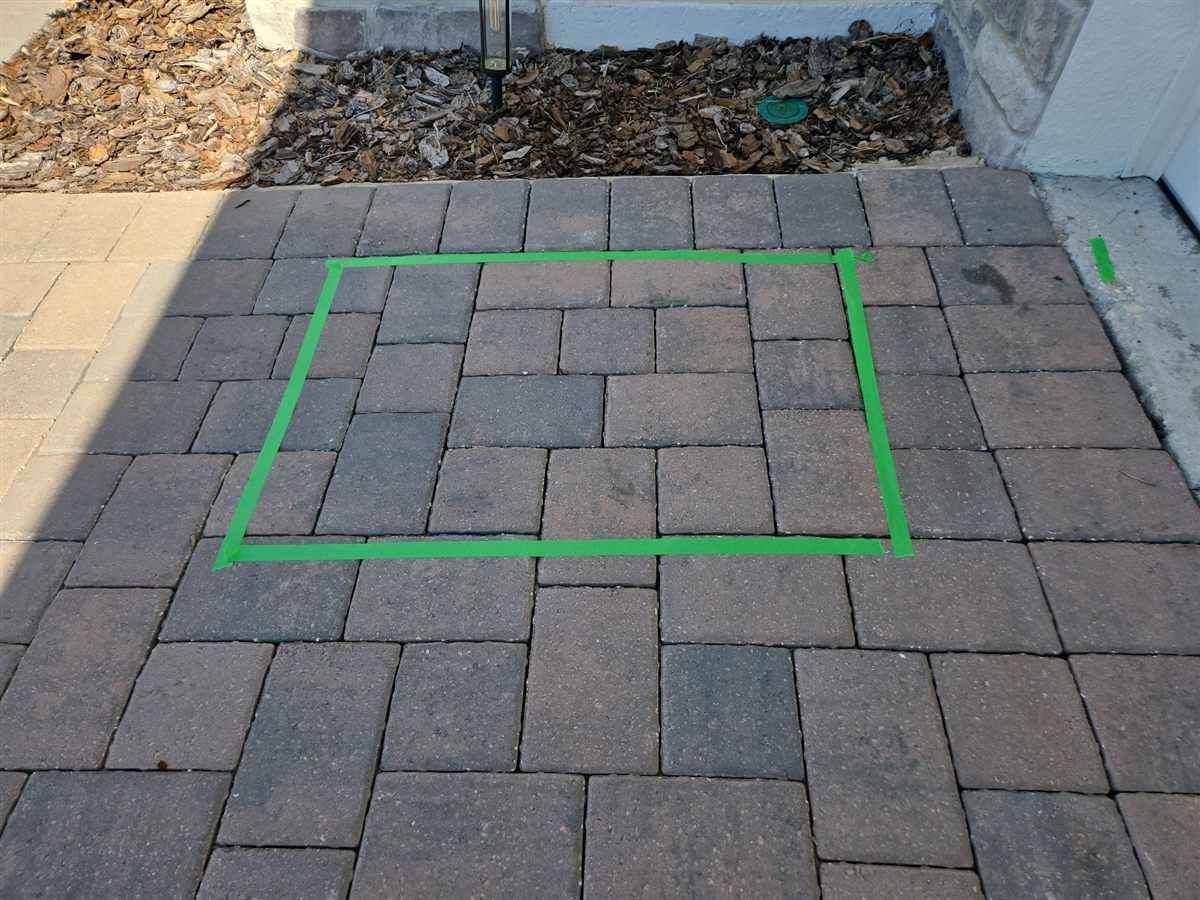
Flatwork is poured on fill that was placed late in the build, often in a hurry, and it settles. Sunken sections at the garage apron, a walkway that has dropped away from the entry step, and patio slabs that now pitch back toward the house are all common at a year. Beyond the trip hazard, flatwork that slopes the wrong way delivers rainwater straight to the foundation.

A settled area in a paver walkway, outlined with tape
A settled area in a paver walkway, outlined with tape.
11-month warranty

Grade settled against the foundation, and roof drainage discharge

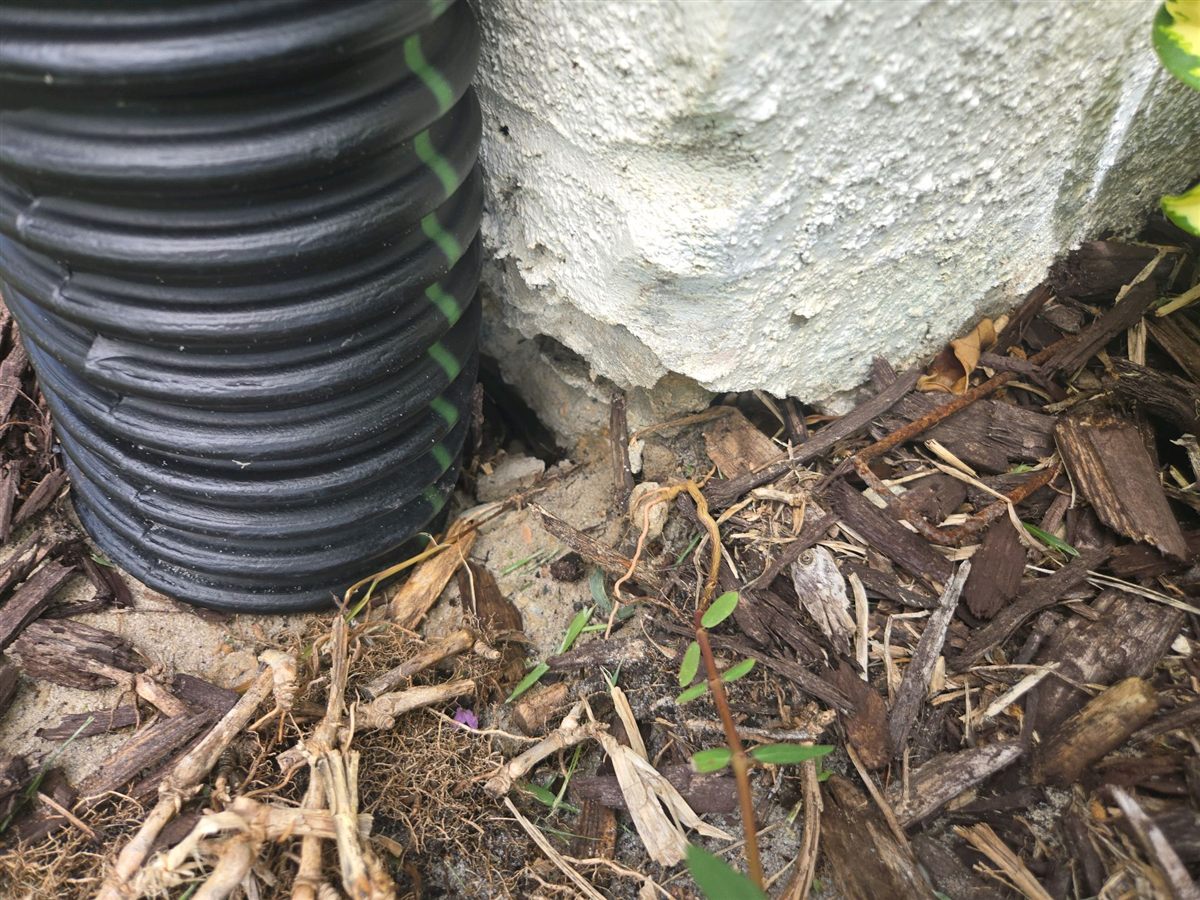
The grading that was correct at closing rarely stays that way through the first rainy season. Backfill over utility trenches settles, mulch beds get built up above the slab edge, and downspouts discharge into a bed that now drains toward the house instead of away from it. This is the single most common first-year finding and one of the easiest to address while the warranty still covers it.

A corrugated downspout drain pipe against a stucco wall where the soil has settled and the stucco edge is exposed
Soil settled away from the foundation beside a buried downspout drain, leaving the bottom edge of the stucco exposed and undercut.
11-month warranty

Nail pops, seam cracking and doors that have gone out of adjustment

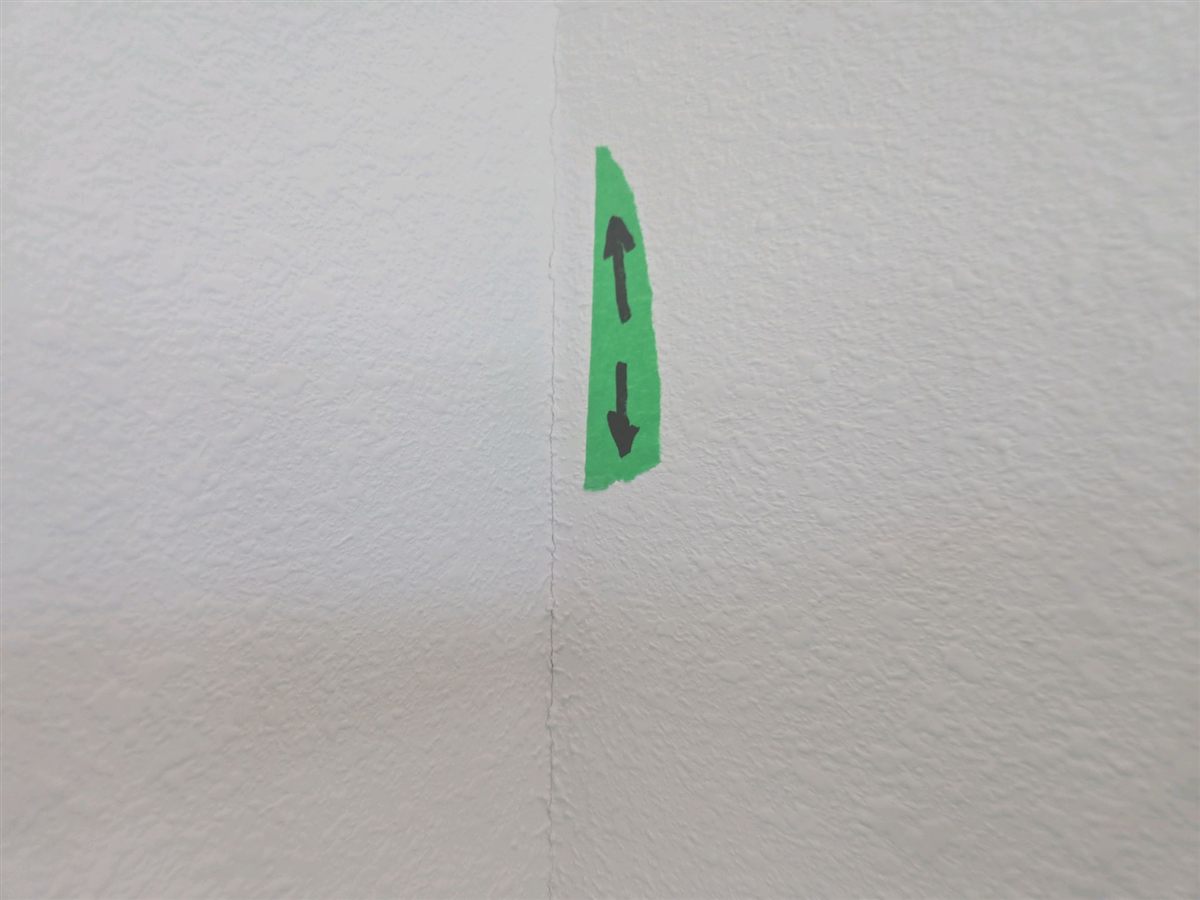
On a block home the exterior walls barely move, but the interior framing, trusses and furring strips dry and shrink over the first year, and the drywall attached to them moves with them. Nail pops along ceilings, hairline cracking at seams and at the corners of openings, and interior doors that now bind or swing on their own are the visible result. These are cosmetic and expected, which is exactly why they belong on a warranty list: they are the kind of item first-year warranties typically address, so document them before the year ends.

A drywall seam crack at the ceiling, marked with a green arrow
A drywall seam crack at the ceiling, marked with a green arrow.
11-month warranty

Attic conditions disturbed after closing

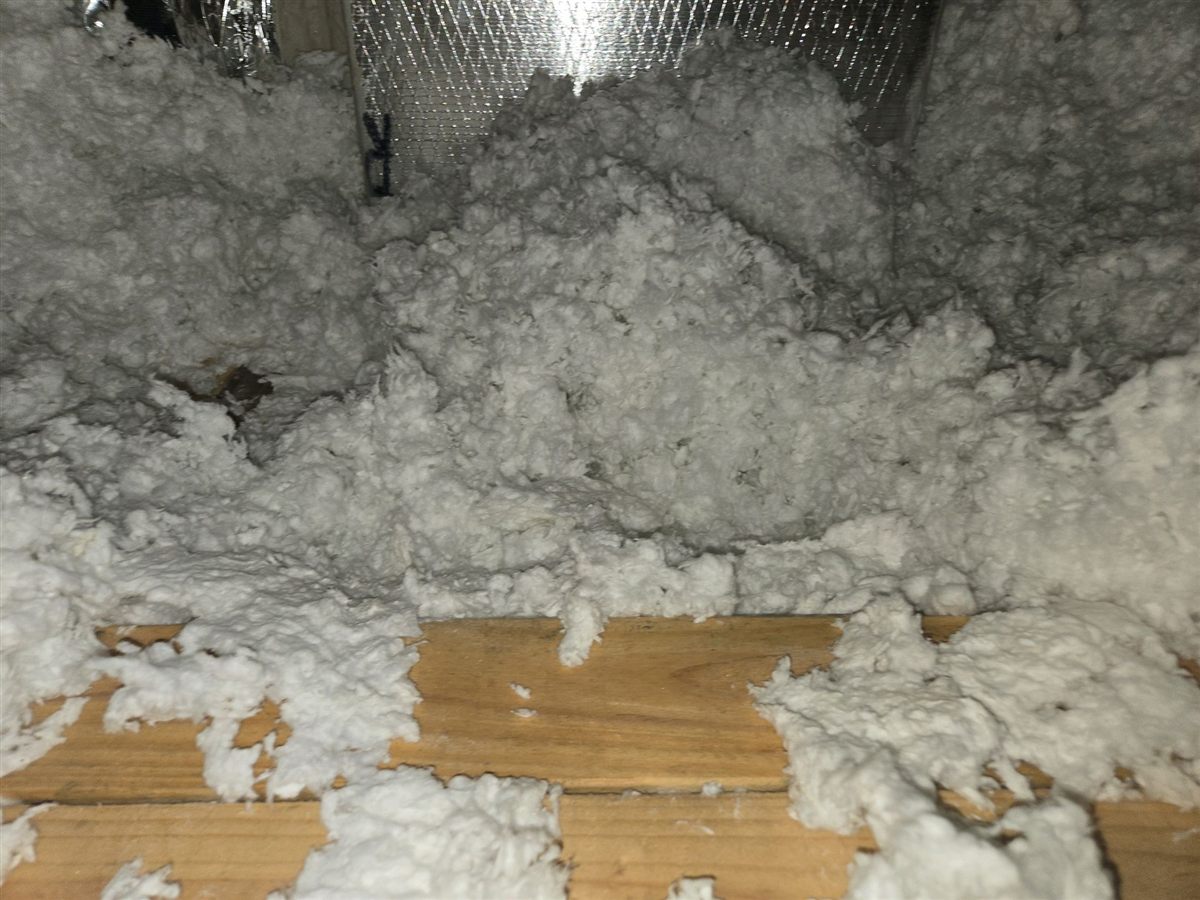
Anyone who has worked in the attic since closing has moved through the insulation to do it. We find insulation compressed into paths across the attic floor, pulled away from the eaves, flex duct knocked off a boot or crushed under a walkway board, and access hatches left without weatherstripping or insulation. A room that has been running warm since the summer often traces back to exactly this.

Blown insulation pushed aside after closing, leaving the ceiling drywall bare
Blown insulation pushed aside after closing, leaving the ceiling drywall bare.
11-month warranty

Sealant failure at roof penetrations and flashings

Plumbing vent boots, flashing at wall intersections, and the sealant around anything that comes through the roof spend a Florida year in direct sun. Boots crack, sealant shrinks away from the edges, and exposed fasteners back out slightly. None of this leaks yet, which is why it is worth finding now, in month 11, rather than in year three when the repair is yours.

11-month warranty

Want this checked on your house?

Tell us your builder, your community and where the build is today, and we will tell you which of these applies and when we should be there.

Phone407-863-2663
Emailinfo@thinkhomeiq.com
HoursWeekdays, early evenings and weekends by appointment
Book an inspection Call